Playhouse on a Hill
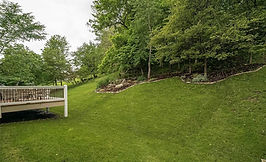
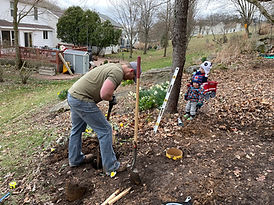
With the playhouse being built into the hill, we felt it was more important than on level ground to really have this anchored well. After deciding on the dimensions, we decided on 6 concrete piers to provide this thing stability. Getting these squared up could be done in a couple different ways, honestly building a box out of two by fours would be more specific, but I put flags into the ground after measuring where I wanted the piers, then used some stakes with yellow rope tied around it to simulate the frame. Once I got it basically squared up, it was time to start digging.
I could have either set the posts into the ground and then poured the concrete around it, or I could do what I chose to do, which was setting a post bracket into the concrete as it set. I opted for the latter because we were building in stages and I didn’t want to have to support the whole thing while I got the base up. Looking back, based on the height of the finished product, we probably should have opted to set the posts in the concrete to provide more stability up top, but we found a way to address that, and we’ll talk about that later. We picked up 3 8” sonotubes that we cut half way to make them 2 feet long. Depending on where you live, you’ll want to research frost lines to determine how far down you need to dig in your area. If you were building a deck, chances are you would have code regulations telling you to dig down 3-4 feet, but seeing as this is a playhouse, I just dug a little below the frost line and called it a day. Be careful to avoid irrigation lines and cables and wires as you dig. I called 811 here in Missouri to make sure we were in the clear, but since they don’t map your irrigation, I had to be careful, which I was glad I was, because on one set of posts, right in the center of the hole, I ran into an irrigation line that I luckily didn’t break, but was going to be a problem for 3 of my 6 post holes, which meant I now had to move those all about 8 inches to the right, which increased the size of the playhouse a little, but was still within the range where the wood I picked up was still long enough.
With the holes dug, it was time to insert the sonotubes (also called concrete molds), and then I opted for Quickcrete quick drying concrete. I really like that stuff because it is quick and easy, and if the hole isn’t too deep, you can just pour the bag of concrete into the hole and then fill with water and it’ll set up pretty quick. With the mixed solution, I placed the brackets into the hole and it was time to call it a day once they were all centered up. Coming back, it was time to get some 4x4 posts set that were going to be the primary structural base for the playhouse. I started with the intention of cutting them to size before mounting them so I didn’t need to worry about cutting them later, but after heeding the better advice of Cassie and my dad, we decided efficiency was a better play than precision that wouldn’t end up being too precise anyway. The posts were screwed into the brackets and as we built them around, we started giving them stability by mounting the 2x6 side boards along the way. Once we had all 6 posts installed and the 2x6s around the edges, I went back, drilled holes through the 2x’s and drove ½” carriage bolts through the 4x posts and gave it the final crank down to give the stability it would need.
Up next was to build out the first floor platform, which admittedly, was pretty overengineered, but was crazy stable. We ran 2x6 stringers (hung vertically) across the platform at 2’ intervals, and then came back and added some cross joists giving the platform a grid layout. The ideas was that by doing these additional cross boards, we would help to avoid some of the twisting and bowing, which I felt was important knowing another level was going on top. Once that was completed, we were ready to build the decking, which consisted of 2x6 floor boards, which were screwed in using deck screws, which went fast. Around the 4x4 posts, we used a jig saw to notch the deck boards to allow for a good fit. That was a natural stopping point and time for a break until the following weekend.
Before more construction started, we did take advantage of a slide that we picked up the prior year and attached it so we could see the kids playing on it. At first, we mounted the slide to the front, which was hilarious, because when combined with the hill, it basically became the worlds fastest slide. Brooke was able to land on her feet and keep running, but the boys were a little too little to manage, and while they enjoyed the speed, it wasn’t something they could do without parental intervention, so the slide was moved to the side of the platform, which calmed things down some.
Moving up to the next level, I took advantage of some large wood clamps, tape measures, pencils, and a 4 foot level to start getting the side boards for the second level in place. I first screwed the outer box in place with some 3” screws, but like the first level, came back and installed carriage bolts to bring overall stability. Like the lower level, we ran some vertically hung stringers for the flooring to attach to, and since we liked the stability of the first level so much, we did cross joists on the top as well. It was more lumber expense and probably not actually necessary, but it helped to solidify the platform. Then it was time to put down the 2x6 floors again, jigging out the sections for the upright posts again. We opted to do both an external access up the back to the top level, as well as a sort of trap door where a set of stairs would go to access from the interior of the playhouse. I framed that out in 2x6 with about a 24x24 opening to allow enough room for the kids to climb up. Once that was completed, we measured to the height that we wanted the top railing to be, and I took a cordless circular saw to cut the 4x4 posts down to size.
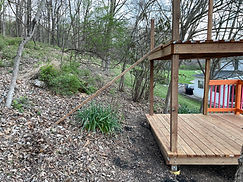
The railings on the playhouse all had the same structure, which was a 2x4 top railing, and then two 2x4 vertically mounted between 4x4 posts set back to flush on the interior side. We added some 4x4 posts in a few spots to provide a more stable railing, and those were mounted into the deck with flush floor brackets. The balusters were cut to size, painted in advance, and hung at about a 3” interval all the way around the railing. We found another slide on facebook that we picked up and ended up installing off the top deck that ran down the back of the playhouse. That also came with an old set of wood stairs from another playground that we mounted into the trap door to give the kids a way to get up top. I also wanted to minimize the twisting and rocking on the top deck, so I took 2x6 and cut them to run on an angle between the posts on the side and back, which really made the top deck so stable that even Brent wasn’t making it shake.
With all of that work completed, we picked up some plywood that we were using for walls, which ended up getting connected to the 4x4 posts, and we did that on 3 sides of the playhouse. We wanted a few windows, so we drew them onto the plywood and using a jig saw, we cut the shapes out, and then framed the windows with some painted internal trip around them.
Painting…handles…tire wall…music wall…
